How to Integrate Jenkins with Selenium for CI/CD Testing

How to Integrate Jenkins with Selenium for CI/CD Testing

July 8, 2025
How to Integrate Jenkins with Selenium for CI/CD Testing

Automated testing is no longer something you add later. It’s part of the development process from day one. If you’re looking to reduce manual effort and spot bugs early, connecting Jenkins with Selenium can make a real difference. This post is one part of our full guide on Automation Testing: Tools, Frameworks, and Best Practices.

Jenkins still leads when it comes to continuous integration setups. As of 2023, it powers around 44% of automation pipelines. Selenium also holds strong, with more than half of QA engineers using it to check how their web apps behave in real browsers.

That said, putting these two tools together isn’t always smooth. You might notice that a test runs fine on your laptop but breaks when Jenkins handles it. Or maybe it takes longer than expected to finish.

In this post, we’ll break down everything step by step, from setting up Jenkins to connecting it with your Selenium scripts, running tests, and tracking results the right way.

What is Jenkins in Selenium?

Jenkins is a popular tool used to automate tasks like building code, running tests, and keeping track of changes. When paired with Selenium, it becomes very useful for running browser-based tests in a repeatable and hands-free way.

Let’s say your team pushes code to a GitHub repository. Instead of manually running Selenium test cases after each change, Jenkins can be set up to do it for you. It pulls the latest code, runs the tests, and shows whether they passed or failed, all without you clicking a single button.

If any test fails, Jenkins logs the output so you can review it later. This helps developers fix problems early, without needing to check every detail by hand.

Using Jenkins with Selenium is a common setup in teams that release code regularly. It helps avoid delays, reduces human effort, and ensures that every update is tested the same way.

Tools and Setup You’ll Need

Here’s what you’ll need before starting:

  1. Java (JDK): Jenkins requires Java to run. Make sure it’s installed and added to your system path.
  2. Jenkins: Install Jenkins on your machine or use a cloud-hosted version. Either works as long as it’s accessible through your browser.
  3. Selenium Scripts: Your Selenium tests should be ready and working locally. You can write them using Java, Python, or any other supported language.
  4. 4. Selenium Scripts: Your Selenium tests should be ready and working locally. You can write them using Java, Python, or any other supported language.

Steps To Download Jenkins

If you’ve never installed Jenkins before, don’t worry. The process is simple if you follow each step one at a time.

  1. Go to the Official Jenkins Website: Visit jenkins.io/download. You’ll see different versions based on your operating system.
  2. Choose the Right Installer: If you’re using Windows, download the .msi package. For macOS, go with the Homebrew or generic installer. Linux users can install it through a package manager or use the .war file.
  3. Start the Installation: For Windows, double-click the installer and follow the prompts. Stick to the default options unless you know what to change. On macOS or Linux, follow the command-line instructions given on the download page.
Jenkins 2.452.1 Setup Wizard welcome screen with Jenkins logo

4. Unlock Jenkins: Once Jenkins is installed, open your browser and go to http://localhost:8080. It will ask for an unlock key. Open the path shown on the screen from file explorer, copy the password from the file, and paste it in the browser window.

Jenkins screen showing the file path to locate the initial admin password on Windows

5. Install Suggested Plugins: Choose “Install suggested plugins” to keep things easy. Jenkins will take a few minutes to download the plugins. Also, install “Selenium Plugin”

Customize Jenkins screen with options to install suggested plugins

6. Create Admin User: You’ll now be asked to create a user. Fill in your details and hit save.

7. Jenkins is Ready: Once setup is done, Jenkins will take you to the main dashboard at http://localhost:8080. From here, you can start creating jobs and linking your test scripts.

Add WebDriver Path in Jenkins (Step-by-Step)

Follow these steps to let Jenkins know where your WebDriver file is saved:

  1. Open Jenkins in Your Browser: Go to http://localhost:8080 to open the Jenkins dashboard.
  2. Click on ‘Manage Jenkins’: From the left-hand menu, find and click the option that says Manage Jenkins.
Jenkins dashboard showing 'Manage Jenkins' option highlighted in the left sidebar menu

3. Go to Global Tool Configuration: Inside the Manage Jenkins page, click on Global Tool Configuration. This is where you define paths for tools Jenkins may need.

Jenkins Global Tool Configuration page with Maven, JDK, and Git setup options

4. Add WebDriver Path: Scroll down and look for a section related to Selenium WebDriver, or configure a new environment variable.

Manually add the full path to your browser driver file (e.g., C:\WebDrivers\chromedriver.exe or /usr/local/bin/chromedriver).

5. Save the Settings: Once the path is filled in, scroll down to the bottom and click the Save button.

This setup tells Jenkins where to find the WebDriver so it can run your tests without errors.

Create a Jenkins Job to Run Selenium Tests

Once Jenkins and WebDriver are set up, follow these steps to create a job that can run your Selenium tests automatically.

  1. Create a New Job: On the dashboard, click on “New Item”.
Jenkins dashboard highlighting the New Item option for creating a new job

2. Give your job a name (e.g., SeleniumTest1) and select “Freestyle project”. Click OK.

Jenkins interface showing new job creation with SeleniumTest1 and project type options

3. Add a Project Description: Under the General tab, you’ll see a text box labeled Description. Use this to write a short note about what this job does — something like Runs login tests using Selenium and TestNG.

Jenkins Freestyle Project general settings screen with configuration options

4. Skip Source Code Management for Now: In the Source Code Management section, select None if you’re not pulling code from a Git repo.
(If you plan to connect your GitHub repo later, you can update this setting.)

Jenkins Source Code Management tab with Git and None options visible

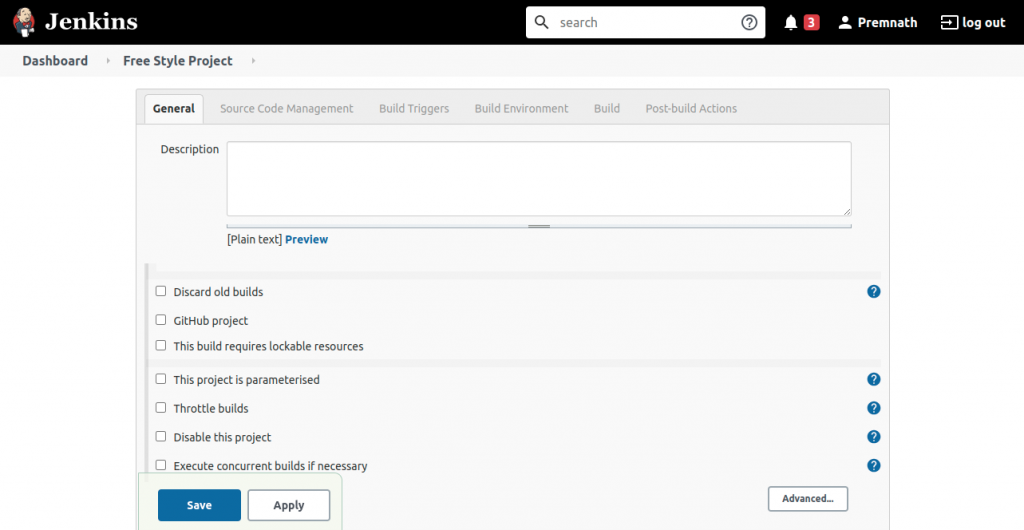
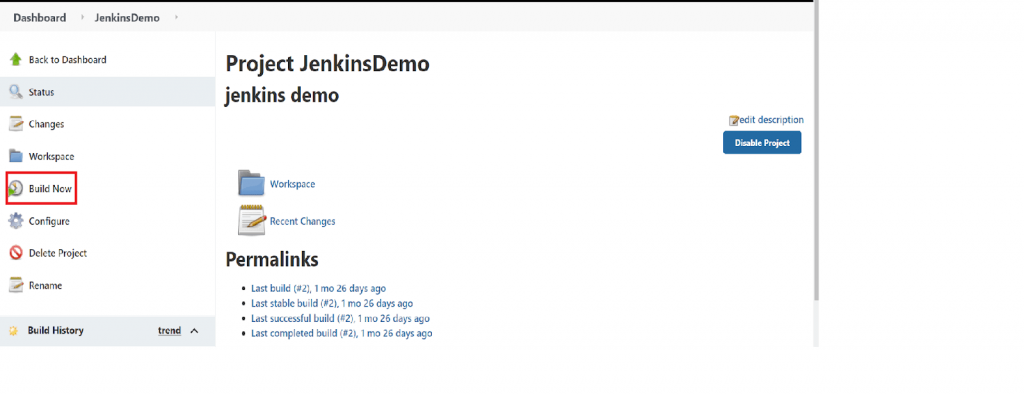
5. Add Build Trigger (Optional): If you want Jenkins to run the job on a schedule, tick Build periodically. You can leave this section blank if you prefer to run the job manually for now.

6. Prepare Your Selenium Test with TestNG: Create your test in Java using Selenium and TestNG. Below is a basic example for logging into OrangeHRM and checking the dashboard:

Make sure to update the Chrome webdriver path in the code below.

package tests;

import org.openqa.selenium.By;

import org.openqa.selenium.WebDriver;

import org.openqa.selenium.chrome.ChromeDriver;

import org.testng.annotations.*;

import static org.testng.Assert.assertTrue;

public class OrangeHRMLoginTest {

    private WebDriver driver;

    @BeforeClass

    public void launchBrowser() {

        System.setProperty(“webdriver.chrome.driver”, “C:/WebDrivers/chromedriver.exe”);

        driver = new ChromeDriver();

        driver.manage().window().maximize();

        driver.get(“https://opensource-demo.orangehrmlive.com/”);

    }

    @Test

    public void checkDashboardHeading() {

        // Login steps

        driver.findElement(By.name(“txtUsername”)).sendKeys(“Admin”);

        driver.findElement(By.name(“txtPassword”)).sendKeys(“admin123”);

        driver.findElement(By.id(“btnLogin”)).click();

        // Check if dashboard text is present

        boolean dashboardVisible = driver

            .findElement(By.cssSelector(“div.head h1”))

            .getText()

            .contains(“Dashboard”);

        assertTrue(dashboardVisible, “Dashboard heading not found”);

    }

    @AfterClass

    public void closeBrowser() {

        if (driver != null) {

            driver.quit();

        }

    }

}

7. Create TestNG.xml: Make a file named TestNG.xml in your project folder. This helps TestNG run the class above.

<?xml version=”1.0″ encoding=”UTF-8″?>

<!DOCTYPE suite SYSTEM “http://testng.org/testng-1.0.dtd”>

<suite name=”TestSuite”>

  <test name=”LoginTest”>

    <classes>

      <class name=”Pages.LoginPage”/>

    </classes>

  </test>

</suite>

8. Create a Batch File to Run Tests: Inside your project folder, create a file named runTests.bat.

Add this line inside:

java -cp bin;lib/* org.testng.TestNG TestNG.xml

Make sure your .class files are inside the bin folder and that lib contains all required .jar files.

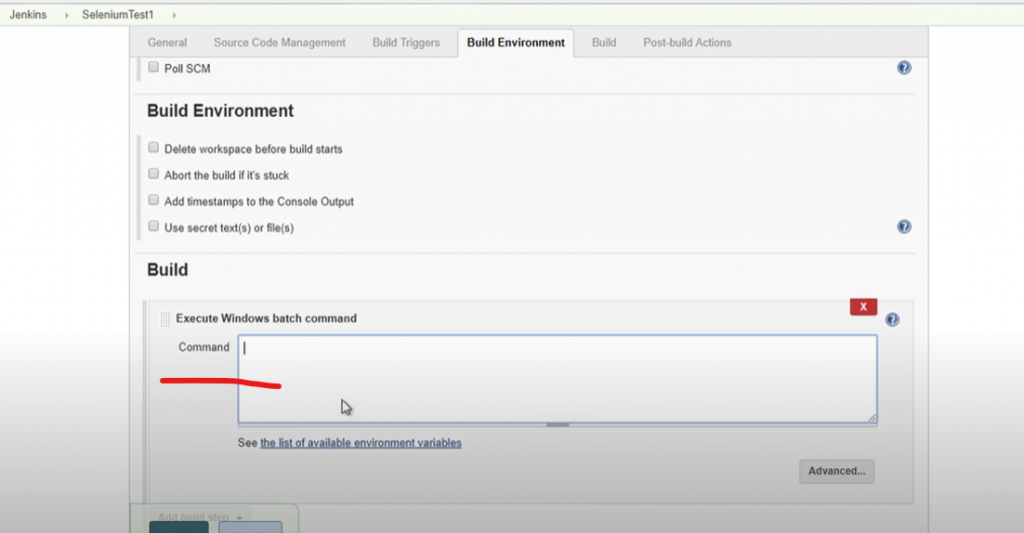
9. Link Jenkins to Your Project Folder: In Jenkins, go to the job you created and click Configure. In the General section, click Advanced. Tick Use custom workspace and provide the full path to your project folder on your system.

10. Add a Build Step to Run the Batch File: Scroll to the Build section. Click Add build step > Execute Windows batch command.

Type the name of the batch file you created earlier:

runTests.bat

Jenkins build configuration showing Execute Windows batch command section

11. Save and Run: Click Apply, then Save. On the job page, click Build Now.

Jenkins will start the job. If everything is set correctly, you’ll see your browser launch and the test will run automatically.

Closing Thoughts

Running your Selenium tests through Jenkins may feel tricky at first, but once things are in place, it saves a lot of time and effort. You no longer need to trigger tests by hand or keep checking if someone forgot to run them.

Even a basic setup like this can help teams catch issues early and keep things consistent across different environments. Over time, it becomes a habit that supports cleaner code and faster feedback.

If you’re looking to go deeper into automation testing and build real skills with tools like Selenium, TestNG, and CI pipelines, check out this hands-on course by STAD Solution. It’s made for learners who want to grow beyond just theory.

FAQs

Yes, you can set up Jenkins to trigger Selenium tests on every code change or based on a fixed time schedule.

No, you can run tests using batch files or shell commands without Maven. Just make sure dependencies are added manually.

Double-check the path to your WebDriver file and add it in Jenkins under Global Tool Configuration or system environment variables.

Yes, you can configure parallel execution using TestNG or Selenium Grid, but it needs extra setup and proper test structure.

Jenkins can run tests on any browser that Selenium supports, like Chrome, Firefox, or Edge, with the correct driver.

The course is designed for beginners and professionals who want to learn real-world testing with Selenium, TestNG, and Jenkins.

Yes, the course walks you through building and running test pipelines using Jenkins, along with practical exercises and guidance.

User Avatar

Richa Mehta

Richa Mehta is the CTO of STAD Solution, an ISO 9001:2015 certified IT training institute. With over 12 years of experience in Software Testing and Automation, she specializes in training aspiring QA professionals in Manual and Automation Selenium, Java, JMeter, Postman, Rest Assured, Jenkins, Git, GitHub, JIRA, Maven, and industry-relevant tools. Richa is passionate about helping freshers and working professionals build strong careers through practical, project-based learning and Trained and Placed Thousands of candidates. LinkedIn : https://www.linkedin.com/in/richa-mehta-0857a355