
Table of Contents
ToggleIf you’re exploring automation testing, you might want to start here first: Automation Testing: Tools, Frameworks, and Best Practices. It covers the broader picture, and this guide goes hands-on with Selenium.
Selenium is one of the most used tools for browser-based testing. According to the Stack Overflow Developer Survey 2023, Selenium is the top choice for 49% of automation testers.
This blog is written for complete beginners who want to learn Selenium using Java, step by step. No advanced setups. No complicated theory.
We’ll go through the required tools, write a basic script, and explore how to interact with real web elements like buttons, inputs, and pop-ups — all using clean Java code.
What Exactly is Selenium?
Selenium is a testing tool that lets you control a browser using code. Instead of checking things manually, you can write instructions and let the code handle it. This saves time and reduces mistakes during testing.
With Selenium, you can open websites, click buttons, fill out forms, check if something is visible, and even handle popups. It works with popular browsers like Chrome, Firefox, Safari, and Edge. That makes it useful for testing across different setups.
You don’t need to learn a new language just for testing. Selenium supports many languages, including Java, Python, and C#. In this guide, we’re using Java because it’s widely used in test automation.
Selenium is used in many real projects because it’s free, works on most systems, and fits well with other tools like TestNG, JUnit, and Maven. It’s reliable and has been around long enough to be trusted by teams worldwide.
Why Choose Java for Selenium Automation?
Java works well with Selenium because it’s stable, fast, and has been around for years. Many companies still use Java-based frameworks, so you’re more likely to find real projects using this combo.
Here’s why Java makes sense for Selenium:
- Plenty of help online: Since many testers use Java, there are tons of code examples, GitHub projects, and Stack Overflow threads to fall back on.
- Easy integration with tools: Tools like TestNG, Maven, Jenkins, and JUnit play nicely with Java.
- Strong typing helps: Java catches errors early during compilation, which can save time while building test scripts.
- Cross-platform support: Write once, run anywhere. Java runs smoothly on Windows, Mac, or Linux.
If you’re learning automation from scratch, Java gives you a reliable base
Setting Up the Environment for Selenium with Java
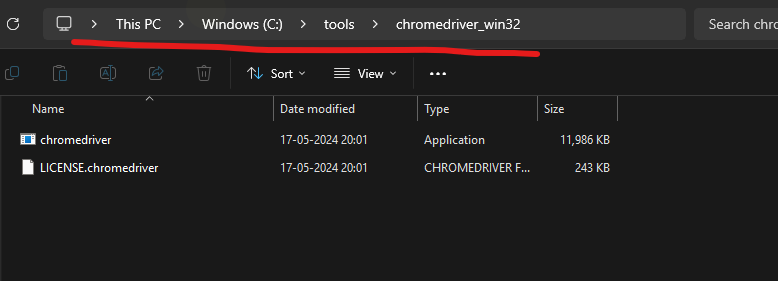
To get started, you need to install a few tools. Follow these steps one by one. Don’t skip any step, because even a small setup mistake can stop the script from working later.
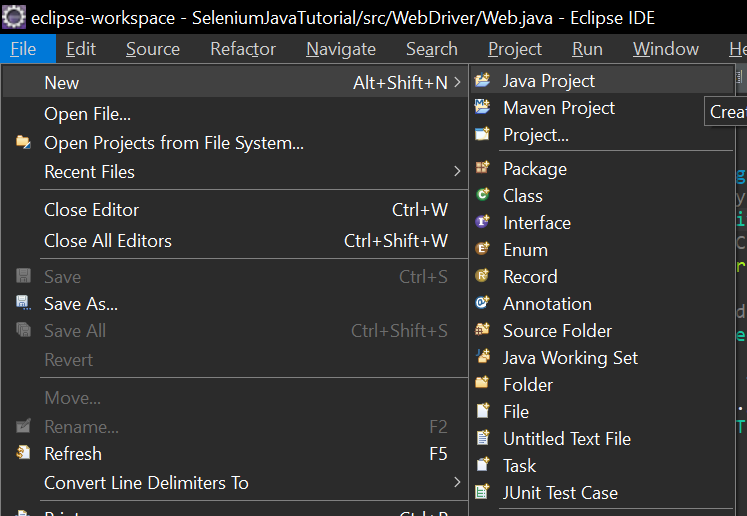
Step 1: Install Java JDK
Selenium needs Java to work. So, the first thing you need is Java Development Kit (JDK).
- Go to the official Java download page.
- Download JDK (pick the version that matches your operating system).
- Run the installer and complete the setup.
- Once installed, open Command Prompt (Windows) or Terminal (Mac/Linux) and type:
java -version
If it shows a version number like Java version “17.0.8”, it means Java is installed correctly.

If not, follow this Java install and setup guide to set the JAVA_HOME path manually.
Step 2: Install an IDE (We’ll Use Eclipse)
An IDE helps you write and run your Java code easily.
- Visit the Eclipse download page.
- Download Eclipse IDE for Java Developers.
- Run the installer and launch Eclipse.
- When prompted for workspace, just click OK to continue.
Step 3: Download Selenium WebDriver
Now you need the Selenium library.
- Go to the official Selenium site
- Download Selenium for Java.
- A ZIP file will be downloaded. After that, extract it anywhere.
- You’ll find .jar files inside that will be needed while writing the script.
Step 4: Set Up Chrome and ChromeDriver
Selenium needs a browser to work with, and we’ll use Google Chrome.
If Chrome is not installed on your system, download it from here.
Now, download ChromeDriver:
- First, check your Chrome version.
- Open Chrome > Click three dots > Help > About Google Chrome
- Go to the ChromeDriver download page.
- Choose the driver version that matches your Chrome version.
- Download the ZIP file and extract it.
- Copy the path where the chromedriver.exe file is stored (e.g. D:\tools\chromedriver\chromedriver.exe)
You’ll need this path in your Java code

Step 5: Create a Java Project and Add Selenium
We’ll do this in Eclipse:
- Open Eclipse → File → New → Java Project

2. Give it a name like SeleniumTest

3. Right-click on the src folder → New → Class → Name it Main
4. Right-click on the project → Build Path → Configure Build Path
5. Go to Libraries tab → click Add External JARs → select all .jar files from the Selenium folder.

6. Click Apply and Close
Write Your First Selenium Test with Java
Step 1: Import the Required Libraries
Before writing the script, you need to tell Java which Selenium classes you’re using.
import org.openqa.selenium.WebDriver;
import org.openqa.selenium.chrome.ChromeDriver;
These two lines import the basic WebDriver interface and the Chrome-specific driver.
Step 2: Set the Path to ChromeDriver
Now, you must tell Java where to find the chromedriver.exe file you downloaded earlier. Don’t forget to replace your chrome driver path.
System.setProperty(“webdriver.chrome.driver”, “Your_chromedriver_path”);
Replace the path above with the location of your ChromeDriver file. Use double backslashes (\\) on Windows.
Step 3: Launch Chrome Browser
Now we’ll launch a Chrome window using Selenium.
WebDriver driver = new ChromeDriver();
This creates a new instance of the Chrome browser. The driver variable controls the browser.
Step 4: Visit a Website
Let’s open Google.
driver.get(“https://www.google.com”);
This tells Selenium to open the given URL in the Chrome window.
Step 5: Print Page Title
Once the page is loaded, you can read the page title and print it to the console.
String title = driver.getTitle();
System.out.println(“Page Title: ” + title);
Step 6: Close the Browser
Always close the browser after test runs to avoid memory issues.
driver.quit();
This closes all Chrome windows opened by the test.
Full Code
import org.openqa.selenium.WebDriver;
import org.openqa.selenium.chrome.ChromeDriver;
public class Main {
public static void main(String[] args) {
// Set path to chromedriver.exe
System.setProperty(“webdriver.chrome.driver”, “Your Chromedriver path”);
WebDriver driver = null;
try {
// Launch Chrome browser
driver = new ChromeDriver();
// Open a website
driver.get(“https://www.google.com”);
// Get and print page title
String title = driver.getTitle();
System.out.println(“Page Title: ” + title);
} catch (Exception e) {
System.out.println(“Something went wrong: ” + e.getMessage());
} finally {
// Close browser if it was opened
if (driver != null) {
driver.quit();
}
}
}
}
Output
This extracts the page title from Google’s website.
Closing Thoughts
That’s it, you’ve just built your first test in Selenium using Java. It may feel like a lot at first, but once the setup is done, writing and running tests become quick.
If you’re planning to learn automation properly and want to go beyond simple scripts, start looking into frameworks like TestNG or JUnit. These help you organize your tests better and run them in bulk.
Need help learning all this with guidance and real-world examples? Check out the Automation Testing Course by Stad Solution. It’s beginner-friendly and covers hands-on training with Selenium, TestNG, and more.
FAQs
Download Selenium JAR files, create a Java project in Eclipse, and add the JARs to your project’s build path manually.
Yes, basic Java is required. You should know loops, conditions, and how to create simple classes or methods before starting Selenium.
No. To automate Chrome, you must use ChromeDriver. It acts as a bridge between Selenium and your Chrome browser.
Knowing Selenium helps, but companies also look for skills like TestNG, frameworks, version control, and understanding of testing concepts.
The course covers Selenium basics, TestNG, real-time projects, and interview-focused practice to help you become job-ready.
Yes, it’s built for freshers and manual testers. No prior automation experience is needed to start the course.
If you study regularly, you can understand Selenium basics and write test scripts in 3 to 4 weeks.


